
Monday, May 28, 2012
Sunday, May 27, 2012
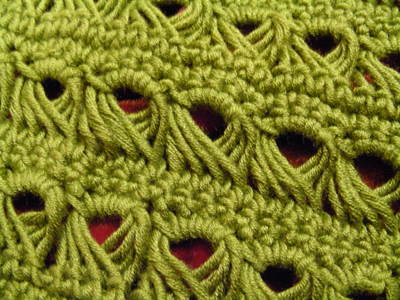
Mostly Nerdy Crochet's Fizzgig Pattern!
Full Credit goes to MNC.
Fizzgig
Fizzgig with pattern!
Well after taking a trip down memory lane with The Labyrinth I, of course, had to watch The Dark Crystal too. So naturally with my movie all set up my fingers were itching for another crochet project. Turned out that the project was a little more involved, but still quite fun. (By fun I mean I was about to pull my hair out getting all of his to look right).
Fizzgig is by far one of the most adorable creatures that Jim Henson created. I mean, part dog, giant mouth, cute temperament, and what amounts to a large ball of fuzz? If I could adopt one I would... but since I can't I made one instead.
Anyway who cares about me blabbing on (I mean really, do you seriously follow this blog because of my creative writing skills?) I demand PICTURES!


Fizzgig Untested Pattern
Body:
(Make these stitches looser than you would normally)
Magic circle with 6 sc in the center
Increase to 12
Inc ever other stitch for three rows
Increase every 3rd stitch for 1 row
Sc 10, inc, sc 10, inc, for 2 rows
4=rows
Ch 25, attach back to the base about half way across with a sc (follow the slack around the circle, this will be the opening for his mouth)
5 = rows
Sc 10, decrease, sc 10, dec for 3 rows
Sc 5, dec, sc 5, dec for 2 rows
Dec every 3rd stitch for 2 rows
Dec until closed.
Mouth:
In red; crochet a basic flat oval with an 8 ch base (more accurate patterns easily found online than what I would be able to describe). Increase in size until it more or less matches the size of the mouth opening. Attach to the mouth opening, but don’t forget to stuff before you close! Only put polyfill in the top and bottom sections, do not fill completely as this will prevent his mouth from closing.
Little feet – Optional (usually you just see him as a giant fluff ball)
Ch 40, link ch 40 to ch 1
2=rows
Ch 4 and link directly across (create a narrow oval with line through it)
Working on half the oval at a time: 1=row*
Using same “ch 4 and attach” separate the half into three sections
Sc around the new thirds and decrease each row until you have a point. Fasten off or slip stitch back to the next opening. Repeat for all three toes.
Repeat from * for the second foot. (they will be very close together, feel free to make each foot individually by skipping the initial large oval).
Attach to the bottom of his body so his toes peak out.
Detail time!
Sc 1 row of dark brown around his mouth. Cut out off white felt in a tooth pattern and sew to the top and bottom of his mouth. Also cut a tiny tooth set for the back of his mouth and sew on. Using black felt cut out his “throat” but remember the little red dangly guy!
Follow the same general procedure for his eyes and nose. As for his fluffiness you will be looping dozens of 2”-3” chunks of yarn through the loose stitches all over his body. Make sure you’ve attached his eyes and nose before you fluff up his face. I had a 4ply yarn that I separated each strand apart to give him extra oomph. Kind of looks like he got a perm, but at least he’s properly fluffed!
(Pictures to help you understand what the heck I'm talking about)

(For the feet)


(For the fuzz)


Thursday, May 24, 2012

Broomstick Lace
I posted this video that Naztazia made here as :
1- an easy way to find it.
2- so others could see it and learn the stitch too. ^^
Socks!


One Size fits All (well, so they say. But use your own judgement and alter the length of the sock for the height of the “all” that you’re making them for. You could end up with crocheted hip waders)
MATERIALS: American Thread Company “Dawn” Knitting Worsted, 4 oz. Black, 3 oz. Scarlet.
Plastic crochet hook size J, or size you need to obtain the specified stitch gauge.
GAUGE: 3 sts = 1″
Note: Work entire sock in back loop of sts. Work in alternate rnds of black and scarlet. When changing colors, work first half of st with color being used, complete st with new color.
SOCKS: Starting at toe, with black, ch 4, join to form ring, ch 3, work 11 dc in ring, join in top of ch-3.
Rnd 2: * Skip 1 sc, 5 sc in next sc, repeat from * around.
Rnds 3 & 4: * Skip 2 sc, 1 sc in next st, 3 sc in next st, 1 sc in next st, repeat from * around.
Rnd 5: * Skip 2 sc, 1 sc in next st, 5 sc in next st, 1 sc in next st, repeat from * around.
Rnds 6 & 7: * Skip 2 sc, 1 sc in each of next 2 sts, 3 sc in next st, 1 sc in each of next 2 sts, repeat from * around.
Repeat Rnds 6 and 7 until there are 11 black stripes, skip 2 sc, sl st in next st, with black ch 12 loosely for heel section, skip 3 points, join ch, cut yarn.
Rnd 21: Skip 1 st, * 1 sc in each of next 2 sts of ch, 5 sc in next ch, 1 sc in each of next 2 sts, skip 2 sts. Repeat from * around – 15 points.
Rnd 22: * 1 sc in each of next 3 sc, 3 sc in next st, 1 sc in each of next 3 sc, skip 2 sc, repeat from * around.
Repeat Rnd 22 alternating colors for 18 stripes or desired length to top.
HEEL: Attach black at start of ch, work 1 sc in each st of ch. Place a marker, work 12 sc on other side of heel, place a marker, work 1 rnd even.
Next Rnd: Work a dec each side of marker – 4 decs in rnd. Repeat last 2 rnds once.
Next Rnd: 2 sc tog all around, cut yarn leaving a 12″ length. Thread through sts, draw tog, fasten securely.
Monday, May 21, 2012
Bunny

Materials: Size 10 crochet thread, size 9 crochet hook, seed beads for eyes if desired, empty pizza box, wax paper or plastic wrap, cellophane tape, glue, water, glitter, small container for glue/water mixture, paintbrush, stick pins that won't be used later for sewing, clear thread or fishing line
Instructions
Ch 60, taking care not to twist chain, sl st into 1st ch.
Round 1: Ch 1 (does not count as sc), 1 sc in same ch, *1 hdc in each of next 2 ch, [yo and draw up loop in next ch, yo and pull through 2 loops on hook] 4 times, yo and draw through all 5 loops on hook (4/dc dec made), 1 hdc in each of next 2 ch, 2 sc in each of next 2 ch; repeat from * around for a total of 6 half-moon slivers, ending with 1 sc in same ch as starting sc at end of final repeat after next-to-last 2 sc in ch; sl st in starting sc.
Round 2: Ch 1 (does not count as sc), 1 sc in same sc as sl st, *hdc in next st; [yo and draw up loop through next st, yo and pull through 2 loops on hook] 3 times, yo and bring through all 4 loops on hook (3/dc dec made), 1 hdc in next st, 1 sc in next st, 2 sc in each of next 2 st, 1 sc in next st; repeat from * around 5 times, ending with 2 sc in final st] of last repeat; sl st in starting sc.
Round 3: Ch 1 (does not count as sc), *1 sc in same st as sl st, sk next hdc, 5 dc in next dc, ck next hdc, 1 sc in each of next 6 sc; repeat from * around 5 times, ending with 1 sc in each of next 5 sc on final repeat instead of next 6 sc; sl st in starting sc.
Round 4: Ch 1 (does not count as sc), 1 sc in same st as sl st, *1 hdc in next dc, 1 dc in next dc, 3 dc in next dc, 1 dc in next dc, 1 hdc in next dc, 1 sc in each of next 6 sc; repeat from * around 5 times, ending with 1 sc in each of last 5 sc on final repeat instead of 6; sl st in starting sc.
Round 5: Ch 2 (does not count as dc), 1 dc in same sc as sl st, *1 dc in each of next 3 st, (making 1st ear) ch 11, sl st in 2nd ch from hook, 1 sc in next ch, 1 hdc in next ch, 1 dc in each of next 2, ch, bring up loop through middle of dc just worked, [yo and bring through both loops on hook (dc inc made; this is equivalent to working 1 sc in middle of dc and similar to linked dc or ldc)] 3 times (equivalent of 3/dc increase but preventing large hole in ch due to so many st), 1 dc in each of next 2 ch, 1 hdc in each of next 2 ch, 1 sc in last ch, sl st in top of last dc made before beginning ear (1st ear complete), 1 dc in same st as dc with sl st, 1 dc in each of next 2 dc (top of head made), (making 2nd ear) ch 14, sl st in 2nd ch from hook, 1 sc in next ch, 1 hdc in next ch, 1 dc in next ch, 4/dc dec across next 4 ch (see 4/dc dec in Round 1), 1 dc in each of next 2 ch, 1 hdc in each of next 2 ch, 1 sc in final ch, sl st in top of last dc made before beginning 2nd ear (2nd ear complete), 1 dc in same st as dc with sl st, 1 dc in each of next 3 st, 1 hdc in next st, sk next st, [1 sc in next st], sk next st, 1 hdc in next st; repeat from * around 5 times, sl st across starting ch 2 into starting dc; bind off. Weave in ends. If using seed beads for eyes, they may be sewed on or they may be glued in place during stiffing. Experiment with eye position before securing beads; eyes lower on the head (halfway point) tend to make critters appear more lovable and endearing; eyes higher on the head (3/4 point) ten to make critters appear more humorous and cheerful.


Thursday, May 17, 2012
Project Illusion
Step one::
Triangle:
Ch 5, join together with a slip st.
Rnd 1: Ch 3 (counts as 1st dc), 2 dc in the ring, ch 4, 3 dc, ch 4, 3 dc, ch 4, join together with slip st to top of ch-3.
Rnd 2: Ch 3 (counts as 1st dc), dc in next 2 dc, *3 dc, ch 4, 3 dc* in ch-4 space, dc in next 3 dc, *3 dc, ch 4, 3 dc* in ch-4 space, dc in next 3 dc, *3 dc, ch 4, 3 dc* in ch-4 space, join together with slip st to top of ch-3.
Rnd 3: Ch 3 (counts as 1st dc), dc in next 5 dc, *3 dc, ch 4, 3 dc* in ch-4 space, dc in next 9 dc, *3 dc, ch 4, 3 dc* in ch-4 space, dc in next 9 dc, *3 dc, ch 4, 3 dc* in ch-4 space, dc in next 3 dc, join together with slip st to top of ch-3.
Rnd 4: Ch 3 (counts as 1st dc), dc in next 8 dc, *3 dc, ch 4, 3 dc* in ch-4 space, dc in next 15 dc, *3 dc, ch 4, 3 dc* in ch-4 space, dc in next 15 dc, *3 dc, ch 4, 3 dc* in ch-4 space, dc in next 6 dc, join together with slip st to top of ch-3.
Rnd 5: Ch 3 (counts as 1st dc), dc in next 11 dc, *3 dc, ch 4, 3 dc* in ch-4 space, dc in next 21 dc, *3 dc, ch 4, 3 dc* in ch-4 space, dc in next 21 dc, *3 dc, ch 4, 3 dc* in ch-4 space, dc in next 9 dc,join together with slip st to top of ch-3.
Triangle is ready.
Step two: Placement.
Wednesday, May 16, 2012
Hawaiian Flowers

Chain 8, slip stitch into first chain to form a ring.
Round one:
Chain 1, work 12 double crochet into ring, join with a slip stitch into first double crochet.
Fasten off.
Round two:
Join a new colour into any double crochet, chain 1, work 1 double crochet into the same stitch, * work 1 double crochet into the next stitch, chain 11, 1 double crochet into the same stitch, work 1 double crochet into the next stitch, chain 1, 1 double crochet into the next stitch, repeat from * around, omitting last 1 double crochet into the next stitch and join with a slip stitch into the first double crochet.
NOTE: Do not fasten off, you will be using the same colour to work Round three.

Round three:
* Work 18 double treble (wrap wool twice around hook) into the 11 chain loop, slip stitch into the 1-ch space of the previous round, repeat from * around, join with a slip stitch to end.
Fasten off.
Round four:
Work a round of double crochet in a contrasting colour as such:
Work 9 double crochet up one side of the petal, chain 3, work 9 double crochet down the other side of the petal, work 1 double crochet into chain 1 space of round two, continue around, join with a slip stitch to end.
Fasten off.
Credit to Sarah London
Doll

THIS PATTERN IS FOR PERSONAL USE ONLY! PLEASE DON’T SELL THIS PATTERN OR DOLLS THAT YOU MAKE! THANK YOU!
Cheek (work 2 in lighter pink)
Rnd 1: 6sc in magic ring
Rnd 2: inc around
Rnd 3 : (1sc, inc) around.
Fasten off.
Feet (make 2)
(For the color changes I found that the best results I get from fastening of and starting with new color. But you can work in rows and see this tutorial http://www.hookandneedles.com/2008/04/10/amigurumi-tutorial-3/ )
(Starting with pink)
Rnd 1: 7 chain
Rnd 2: starting from a second chain from hook - 5sc, 3sc in one ch, working on the other side of the chain - 5sc, inc
Rnd 3: inc, 4 sc, inc, sc, inc, 5 sc, inc, sc
Rnd 4: 5sc, 4dec, 6sc
Rnd 5: 3sc, 4dec, 4sc
Rnd 6: 4sc, dec, 5sc
Rnd 7- 11: sc around
(Change to white yarn)
Rnd 12-13: sc around
(Change to black yarn)
Rnd 14-15: sc around
(Change to white yarn)
Rnd 16-17: sc around
(Change to black yarn)
Rnd 18-19: sc around
(Change to white yarn)
Rnd 20-21: sc around
(Change to black yarn)
Rnd 22-23: sc around
(Change to white yarn)
Rnd 24-32: sc around
For first leg, join with sl st in first st. Fasten off.
For second leg, do not sl st in first st. Do not fasten off.
Body and head
With white
Rnd 1: Hold legs together. Be sure that both legs are facing right direction. Insert hook in the first leg, pull out the loop from second leg, sc in same st , sc in next stitch (do not count this two stiches, sc in next 9 sts on second leg (mark first st), sc in next 9 sts on first leg. (18)
Rnd 2: sc around
Rnd 3: (2 sc, inc) around
Rnd 4: (3 sc, inc) around
Rnd 5: (4 sc, inc) around
Rnd 6-10: sc around
(Change to pink)
Rnd 11: sc around
Rnd 12: back loops only – sc around
Rnd 13: sc around
(Change to white)
Rnd 14: 4sc, dec
Rnd 15-17: sc around
Rnd 18: 3sc, dec
Rnd 19-23: sc around
Rnd 24: 2 sc, 2 dec
(Change to skin color)
Rnd 25: back loops only – sc around
Rnd 26: dec around
Stuff body and insert q-tip or something like pipe cleaner in the neck.
(Head)
Rnd 27: inc around
Rnd 28: (sc, inc) around
Rnd 29: (2sc, inc) around
Rnd 30: (3sc, inc) around
Rnd 31: (4sc, inc) around
Rnd 32: sc around
Rnd 33: (5sc, inc) around
Rnd 34: sc around
Rnd 35: (6sc, inc) around
Rnd 36: sc around
Rnd 37: (7sc, inc) around
Rnd 38-43: sc around
This is where I sew cheeks on and embroidery the mouth.
(Change to pink)
Rnd 44: sc around
Rnd 45: (7sc, dec) around
Rnd 46: sc around
Rnd 47: (6sc, dec) around
Rnd 48: (5sc, dec) around
Rnd 49: sc around
Rnd 50: (4sc, dec) around
Rnd 51: (3sc, dec) around
Rnd 52: (2sc, dec) around
Stuff the head.
Rnd 53: (sc,dec) around
Rnd 54: dec around.
For finishing I’ve used this tutorial http://www.planetjune.com/blog/amigurumi-help/fastening-off/
Skirt
Work in front loops of 12th round of body with head facing toward you. Join with sl st , ch 1, sc in same stitch.
Rnd 1: sc around
Rnd 2: (5sc, in) around
Rnd 3-9: sc around
Rnd 10: front loops only – (6sc, inc) around
Rnd 11: (7sc, inc) around
Rnd 11: (8sc, inc) around
Rnd 12: inc around. Fasten off.
Working in back loops of 10th round of the skirt
Join with sl st , ch 1, sc in same stitch.
Rnd 1-3: sc around
Rnd 4: (2sc, inc) around
Rnd 5: (3sc, inc) around
Rnd 6: (chain 3, sc in next stitch) around.
Fasten off.
Arms (make two)
With skin color
3 in magic ring
Rnd 1: inc around
Rnd 2: sc around
Rnd 3: 3sc, (thumb) chain 3, slip stitch in second chain from hook, slip stitch in next stitch, work sc in remaining 3 stitches.
Rnd 4: (sc, dec) around
Rnd 5: inc around
Rnd 6-22: sc around
With white
Rnd 23: sc around
In front loops only
Rnd 24: 2sc, in next stitch work sc, hdc, hdc, (4 dc in next stitch) two times, in next stitch work hdc, hdc, sc, and finally work 2 sc.
Fasten off. Leave a long tail to sew arms to body.
Hair (pink)
I have worked chains from 15 to 40 stitches and than worked 3 hdc or 3 dc in one chain. Than I insert hook where I wanted the curl, pull the tail through and tie a square knot with both ends. Insert ends in the head.
Hair band and bow (black)
Chain about 20 stitches. It supposed to be long as the pink part of the head is from side to side. Work 5 rows.
Chain 24. Slip stitch to first chain and work 4 rounds. Do not fasten off. Bring the seam of bow on the back, in the middle, than chain 6 and slip stitch it in the first chain. Sew the bow onto the band. Than sew the band onto the head to cover the beginning of the hair.
Sew the buttons on.
It’s finally finished! Congratulation!
Tuesday, May 15, 2012
Irish Dreams Doily

Finished Size
15 1/2 inches x 21 1/2 inchesMaterials
- 650 yds. white size 10 nylon thread
- 218 yds. Pearl #32 Blending Filament by Kreinik
- 11 yds. Periwinkle #9294 (blue) #16 Braid by Kreinik
- No. 6/1.8mm steel hook or hook size needed to obtain gauge
Gauge
Steps 1-3 of Motif = 2 inches x 2 1/2 inches. Each Flower = 2 inches across.Basic Stitches
Ch, sl st, sc, hdc, dcFirst Motif
Cording
Cut 60-inch piece of white thread. With blue braid, place slip knot on hook, join with sl st in center of 60-inch piece, fold in half. You will be working over both strands of Cording for entire rnd.Note: For picot, ch 3, sl st in top of last sc made.
Step 1: For first ring, working over both strands of Cording, work 8 sc, (picot -- see Note, 3 sc) 9 times, sl st in first st of 8-sc group (first ring completed).
Step 2: For second ring, 7 sc, (picot, 3 sc) 11 times, sl st in fifth st of 8-sc group on first ring, 3 sc, sl st in first st of 8-sc group on first ring.
Step 3: For third ring, (3 sc, picot) 9 times, sl st in fourth st of 7-sc group on second ring, 3 sc, sl st in first st of 8-sc group on first ring. Fasten off.
Note: For joined picot, ch 1, drop lp from hook, insert hook in center of specified picot, pull dropped lp through, ch 1, sl st in top of last st made.
Step 4: For bar, join white thread with sc over Cording, 13 sc, (picot, 3 sc) 6 times, picot; for ring, 7 sc, picot, 3 sc, joined picot (see Note) in fifth picot of third ring, 3 sc, picot, 3 sc, place last sc made behind last 7-sc group, sl st in fourth st of same 7-sc group.
Step 5: For bar, (3 sc, picot) 7 times; for ring, 7 sc, picot, 3 sc, joined picot in second picot of second ring, 3 sc, picot, 3 sc, place last sc made behind last 7-sc group, sl st in fourth st of same 7-sc group.
Step 6: For bar, (3 sc, picot) 5 times; for ring, 7 sc, picot, 3 sc, joined picot in fifth picot of second ring, 3 sc, picot, 3 sc, place last sc made behind last 7-sc group, sl st in fourth st of same 7-sc group.
Step 7: Repeat step 6, working joined picot in seventh picot of second ring.
Step 8: Repeat step 6, working joined picot in tenth picot of second ring.
Step 9: For bar, (3 sc, p) 7 times; for ring, 7 sc, picot, 3 sc, joined picot in fifth picot of first ring, 3 sc, picot, 3 sc, place last sc made behind last 7-sc group, sl st in fourth st of same 7-sc group.
Step 10: For bar, (3 sc, picot) 7 times, 14 sc (last bar completed), join with sl st in first sc made on first ring. Fasten off. Trim excess Cording.
Second Motif
Cording
Work same as First Motif's Cording.Steps 1-3: Repeat same Steps of First Motif.
Step 4: For bar, join white thread with sc over Cording, 13 sc, (picot, 3 sc) 3 times, joined picot in fourth picot of last bar on First Motif, (3 sc, picot) 3 times; for ring, 7 sc, picot, 3 sc, joined picot in fifth picot of third ring, 3 sc, picot, 3 sc, place last sc made behind last 7-sc group, sl st in fourth st of same 7-sc group.
Steps 5-9: Repeat same Steps of First Motif.
Step 10: For bar, (3 sc, picot) 3 times, 3 sc, joined picot in fourth picot of first bar on First Motif, (3 sc, picot) 3 times, 14 sc, join with sl st in first sc made on first ring. Fasten off. Trim excess Cording.
Flower No. 1
Cording
Cut three strands of white thread each 50 inches long. With one strand thread and one strand filament held together as one, join with sl st around center of all threads held together as one; you will be working around six strands of Cording unless otherwise stated.Rnd 1: Work 16 sc around Cording, join with sl st in first sc, separate three strands from six and cut remaining strands close to ring (16 sc made) Pull the three hanging strands of thread to close ring.
Rnd 2: For petals, working over Cording, (sc, hdc, 7 dc, hdc, sc, ch 3, sc, hdc, 7 dc, hdc, sc in first sc of petal, sl st in next 2 sc on ring) 7 times, (sc, hdc, 7 dc, hdc, sc) around Cording, ch 1, sl st in center picot of center bar on one end of center Motifs, ch 1, (sc, hdc, 7 dc, hdc, sc in first sc of petal) around Cording, sl st in last 2 sts of ring. Fasten off.
 Flower No. 2
Cording
Work same as Flower No. 1 Cording.
Rnd 1: Repeat same rnd of Flower No. 1.
Rnd 2: For petals, *(sc, hdc, 7 dc, hdc, sc, ch 3, sc, hdc, 7 dc, hdc, sc in first sc on petal) around Cording, sl st in next 2 sc on ring; repeat from * 5 more times, (sc, hdc, 7 dc, hdc, sc) around Cording, ch 1, sl st in center picot of next bar on center Motifs (see diagram), ch 1, (sc, hdc, 7 dc, hdc, sc in first sc on petal) around Cording, sl st in next 2 sts on ring, (sc, hdc, 7 dc, hdc, sc) around Cording, ch 1, sl st in ch-3 sp of next unworked petal on last Flower, ch 1, (sc, hdc, 7 dc, hdc, sc in first sc on petal) around Cording, sl st in last 2 sts of ring. Fasten off.
Flower No. 3
Work same as Flower No. 2.Flower No. 4
Joining to first free picot of next bar on center Motifs instead of center picot, work same as Flower No. 2.Flower No. 5
Joining to last free picot of next bar on center Motifs instead of center picot, work same as Flower No. 2.Flowers No. 6-10
Work same as Flower No. 2.Flower No. 11
Joining to first free picot of next bar on center Motifs instead of center picot, work same as Flower No. 2.Flower No. 12
Joining to last free picot of next bar on center Motifs instead of center picot, work same as Flower No. 2.Flower No. 13
Work same as Flower No. 2.Flower No. 14
Cording
Work same as Flower No. 1 Cording.Rnd 1: Repeat same Rnd 1 of Flower No. 1.
Rnd 2: Working over Cording, (sc, hdc, 7 dc, hdc, sc, ch 3, sc, hdc, 7 dc, hdc, sc in first sc of petal, sl st in first 2 sts of ring) 5 times, (sc, hdc, 7 dc, hdc, sc) around Cording, sl st in ch-3 sp of corresponding petal on first Flower, (sc, hdc, 7 dc, hdc, sc in first sc of petal) around Cording, sl st in next 2 sts on ring, (sc, hdc, 7 dc, hdc, sc) around Cording, ch 1, sl st in center picot of next bar on center Motifs, ch 1, (sc, hdc, 7 dc, hdc, sc in first sc on petal) around Cording, sl st in next 2 sts on ring, (sc, hdc, 7 dc, hdc, sc) around Cording, ch 1, sl st in ch-3 sp of next unworked petal on last Flower, ch 1, (sc, hdc, 7 dc, hdc, sc in first sc on petal) around Cording, sl st in last 2 sts of ring. Fasten off.
First Round
Cording
Cut 160-inch piece of white thread. With white thread, join with sl st in center of 160-inch piece, fold in half. You will be working over both strands of Cording for entire round. Work this round with wrong side of Flowers facing you.Step 1: 6 sc, (picot, 3 sc) 2 times, with wrong side of Flowers facing you, joined picot in ch-3 sp of second free petal on Flower No. 1, (3 sc, picot) 2 times, 5 sc, place last sc made behind first 6-sc group, sl st in first sc (first ring), (3 sc, picot) 5 times (first bar); for ring, *9 sc, (picot, 3 sc) 2 times, joined picot in ch-3 sp of next petal on same Flower, (3 sc, picot) 2 times, 5 sc, place last sc made behind first 9-sc group, sl st in fourth sc; for bar, (3 sc, picot) 5 times; repeat from *.
Step 2: For ring, 9 sc, (picot, 3 sc) 2 times, joined picot in ch-3 sp of second free petal on next Flower, *(3 sc, picot) 2 times, 5 sc, place last sc made behind first 9-sc group, sl st in fourth sc; for bar, (3 sc, picot) 5 times*; for ring, 9 sc, (picot, 3 sc) 2 times, joined picot in ch-3 sp of next petal on same Flower; repeat between **.
Repeat Step 2 five more times. Step 3: For ring, 9 sc, (picot, 3 sc) 2 times, joined picot in ch-3 sp of second free petal on Flower No. 8, *[(3 sc, picot) 2 times, 5 sc, place last sc made behind first 9-sc group, sl st in fourth sc; for bar, (3 sc, picot) 5 times]; for ring, 9 sc, (picot, 3 sc) 2 times, joined picot in ch-3 sp of next petal on same Flower; repeat from *; repeat between [].
Repeat Step 2 six more times. At end of last Step, 3 sc, join with sl st in first sc of first 6-sc group on Step 1. Fasten off. Trim excess Cording.
Second Round
Cording
Cut 320-inch piece of white thread. With white thread, join with sl st in center of 320-inch piece, fold in half. You will be working over both strands of Cording for entire round. Step 1: 6 sc, *(picot, 3 sc) 2 times, joined picot in second picot of first bar on First Round, (3 sc, picot) 2 times, 5 sc, place last sc made behind first 6-sc group, sl st in first sc (first ring), *(3 sc, picot) 3 times (first bar); for ring, 9 sc, (picot, 3 sc) 2 times, joined picot in fourth picot of same bar on First Round, 3 sc, joined picot in second picot of last ring, 3 sc, picot, 5 sc, place last sc made behind last 9-sc group, sl st in fourth sc, 3 sc, picot, 7 sc, (picot, 3 sc) 5 times, sc in base of fourth st of last 7-sc group (first outer ring), 3 sc, picot*.
Step 2: For ring, *9 sc, (picot, 3 sc) 2 times, joined picot in second picot of next bar on First Round, 3 sc, joined picot in second picot of last ring, 3 sc, picot, 5 sc, place last sc made behind first 9-sc group (on this step), sl st in fourth sc; for bar, (3 sc, picot) 3 times; for ring, 9 sc, (picot, 3 sc) 2 times, joined picot in fourth picot of same bar on First Round, 3 sc, joined picot in second picot of last ring, 3 sc, picot, 5 sc, place last sc made behind last 9-sc group, sl st in fourth sc; for bar, (3 sc, picot) 3 times; repeat from * 13 more times.
Step 3: For ring, 9 sc, (picot, 3 sc) 2 times, joined picot in second picot of next bar on First Round, (3 sc, picot) 2 times, 5 sc, place last sc made behind first 9-sc group, sl st in third sc of 9-sc group; repeat between ** of Step 1.
Step 4: Repeat Step 2, 3 sc, join with sl st in first st of first 6-sc group on Step 1. Fasten off. Trim excess Cording.
Third Round
Cording
Cut 250-inch piece of white thread. With white thread, join with sl st in center of 250-inch piece, fold in half. You will be working over both strands of Cording for entire round. Step 1: For ring, 6 sc, picot, (3 sc, picot) 2 times, 5 sc, place last sc made behind first 6-sc group, sl st in first sc; for ring, 11 sc, (picot, 3 sc) 2 times, joined picot in first picot of ring just made, 5 sc, place last sc made behind last 11-sc group, sl st in sixth st of 11-sc group, 5 sc, joined picot in center picot of first outer ring on Second Round.
Step 2: For ring, 10 sc, picot, (3 sc, picot) 2 times, 5 sc, place last sc made behind last 10-sc group, sl st in sixth st of last 10-sc group; for ring, 11 sc, (picot, 3 sc) 2 times, joined picot in first picot of ring just made, 5 sc, place last sc made behind last 11-sc group, sl st in sixth st of 11-sc group, 10 sc, joined picot in center picot of next bar on Second Round.
Step 3: For ring, *16 sc, picot, (3 sc, picot) 2 times, 5 sc, place last sc made behind last 16-sc group, sl st in eleventh st of 16-sc group; for ring, 11 sc, (picot, 3 sc) 2 times, joined picot in first picot of ring just made, 5 sc, place last sc made behind last 11-sc group, sl st in sixth st of 11-sc group, 10 sc, skip next bar on Second Round, joined picot in center picot of next bar on Second Round; repeat from * 13 more times.
Step 4: For ring, 16 sc, picot, (3 sc, picot) 2 times, 5 sc, place last sc made behind first 16-sc group, sl st in eleventh sc; for ring, 11 sc, (picot, 3 sc) 2 times, joined picot in first picot of ring just made, 5 sc, place last sc made behind last 11-sc group, sl st in sixth st of 11-sc group, 5 sc, joined picot in center picot of next outer ring on Second Round.
Step 5: Repeat Step 2.
Step 6: Repeat Step 3, 10 sc, join with sl st in first st of first 6-sc group on Step 1. Fasten off. Trim excess Cording.
Fourth Round
Cording
Cut 180-inch piece of white thread. With white thread, join with sl st in center of 180-inch piece, fold in half. You will be working over both strands of Cording for entire round. Step 1: For ring, 6 sc, joined picot in first picot of second ring on any 2-ring group, 3 sc, picot, 3 sc, joined picot in third picot of first ring on next 2-ring group, 5 sc, place last sc made behind first 6-sc group, sl st in first st of 6-sc group; for bar, 5 sc, picot, (3 sc, picot) 4 times.
Step 2: For ring, *11 sc, skip next ring, joined picot in first picot of second ring on next 2-ring group, 3 sc, picot, 3 sc, joined picot in third picot of first ring on next 2-ring group, 5 sc, place last sc made behind last 11-sc group, sl st in sixth st of 11-sc group; for bar, 5 sc, picot, (3 sc, picot) 4 times; repeat from * around, 5 sc, join with sl st in first st of first 6-sc group on Step 1. Fasten off. Trim excess Cording.
Subscribe to:
Comments (Atom)